On completion of this stage you should be familiar with the following concepts:
|
Modeling notions: |
Slot names (reserved & user-defined) |
|
Modeling techniques: |
Adding views to the application Processing a row selected in a display table Updating data stored in the database |
|
Useful process templates: |
Update |
|
Useful display templates: |
<Selected Row> (in Simple Table) |
In this stage you will add a new view to the application. In addition to the initial view, used to enter requisitions, the new view is used by managers to approve requisitions.
This stage’s modeling should be performed in the Requisition Management system (5-6) project, you imported at the end of the previous stage.
We shall now add a second view to our application, Requisition Approval. This view will be used by managers to view requisitions entered by their employees and decide whether to approve them (or, in the next stage, reject them).
Zoom to the root model (Requisition Management System).
Select the Display/View
template (![]() )
in the Palette and drop it next to the Open
Requisitions view.
)
in the Palette and drop it next to the Open
Requisitions view.
Name it Requisition Approval.
The model should now look similar to the following:
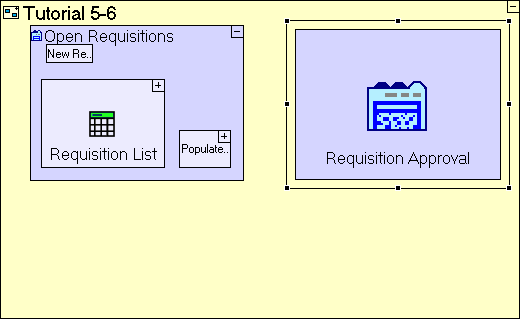
The Requisition Approval view will contain a list of open requisitions and buttons to Approve/Reject requisitions.
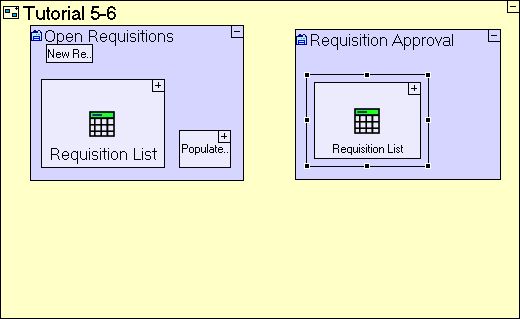
We have already modeled the list of open requisitions in a previous stage, so let's reuse it:
Drag Requisition List from the Repository (or Outline) and drop it in the Requisition Approval view.
The model should look similar to the following:
Save your work and view the application in the browser. Note the additional tab Requisition Approval to the right of Open Requisitions view.
If you click Requisition Approval, you should see the following (the Requisition List table is displayed but is still empty):
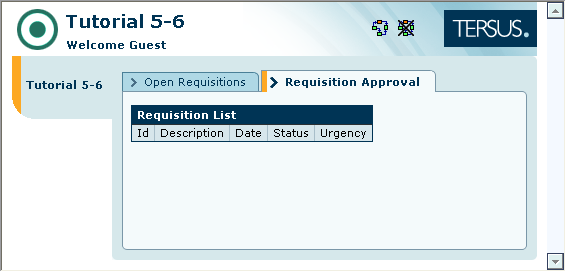
The Requisition List is empty because we have not reused the process which populates it originally (in the Open Requisitions view) - Populate Open Requisitions List.
Let’s have a look at this process and recall what it does:
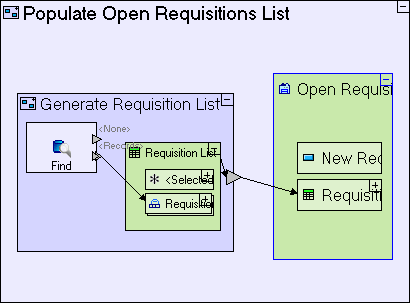
The Populate Open Requisitions List process includes a Generate Requisition List process which creates a Requisition List data element populated with Requisitions from the database. The generated Requisition List is then sent to populate the table display through the Open Requisitions ancestor reference.
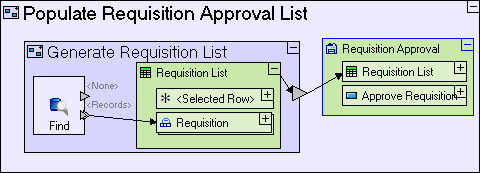
This is nearly identical to what we want to perform here, except that the target table display is in the Requisition Approval view (the new view we have just defined) rather than the Open Requisitions view (the original view). So, we should create a new Populate Requisition Approval List process in the current view, reusing the Generate Requisition List process.
Zoom into Requisition Approval.
Select Basic/Action in the palette and drop it in Requisition Approval.
Name it Populate Requisition Approval List.
To reuse Generate Requisition List, drag it from the outline and drop it into Populate Requisition Approval List.
Right-click on the Populate
Requisition Approval List element, select Add
Ancestor Reference from the menu, and select
![]() Requisition Approval.
Requisition Approval.
Use the Flow tool to link the exit of Generate Requisition List to Requisition Approval/Requisition List.
The model should look similar to the following:
Save your work and view the application in the browser.
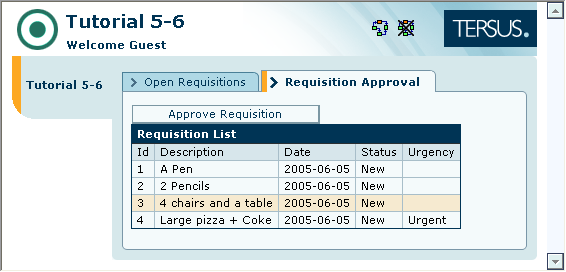
If you click on the Requisition Approval tab, you should see the following:
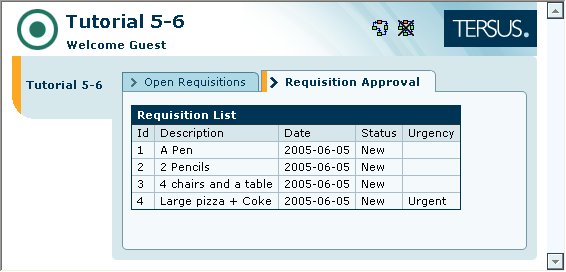
You can verify that the requisition list appears in both views and updated when a new requisition is entered in the Open Requisitions view.
The Requisition Approval view should provide a manager with the ability to select a row in the table and mark it Approved (or Rejected).
Let’s start with creating the button itself. To keep this view consistent with the Open Requisitions view, place the button above the table:
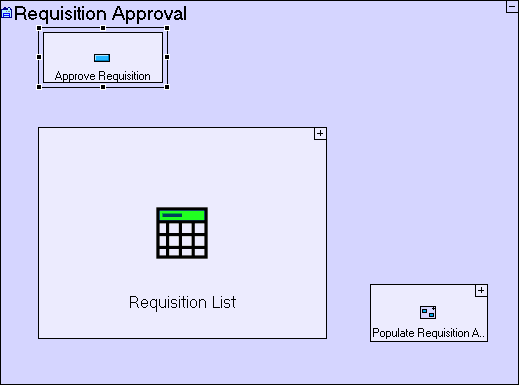
Select Display/Button in the palette and drop it in Requisition Approval (above the Requisition List).
Name it Approve Requisition.
The Requisition Approval model should look similar to the following:
Now, let’s model the button logic, which should consist of the following:
Retrieving the selected row from the table
Changing the Status field value for the row to Approved
Updating the corresponding record in the database
Refreshing the Requisition List table to display the updated record
To retrieve the selected row from a table display, we first need to include a reference to the display.
Zoom into Approve Requisition.
Right-click on Approve
Requisition, select Add
Ancestor Reference from the menu, and select,
![]() Requisition Approval.
Requisition Approval.
The Approve Requisition model should look similar to the following:
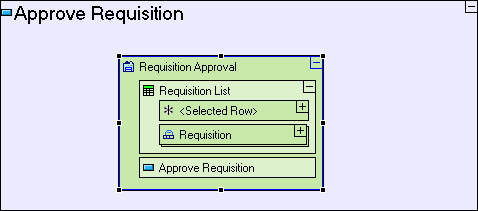
The <Selected Row> data element is included by default in any display element based on the Simple Table (or Table) template. Whenever the user clicks a row in the table (at runtime), the <Selected Row> element will contain the data in that row.
The <Selected Row>
element supports any row structure defined in it's parent model (the
table). This is possible as it is based on the
![]() Anything
data type.
Anything
data type.
The <Selected Row> element returns the selected row as a Requisition data structure. We should now create a process which changes the Status of the selected requisition to Approved.
Select Basic/Action in the palette and drop it next to the Requisition Approval ancestor reference.
Name it Change Requisition Status.
The Change Requisition Status process we are creating should receive the selected Requisition as input:
Select the Trigger
slot (![]() )
in the palette and drop it on the frame of Change
Requisition Status.
)
in the palette and drop it on the frame of Change
Requisition Status.
Add Flow linking Requisition Approval/Requisition List/<Selected Row> to the trigger just added to Change Requisition Status.
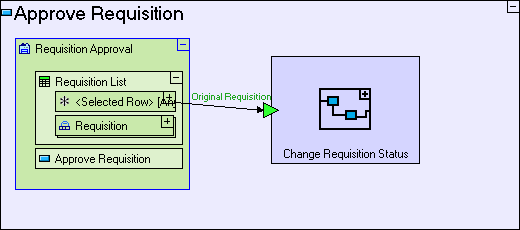
In a moment we will add additional slots, so it would be a good idea to name the slot we have just created so that its purpose (and content) is clear to anyone looking at the model.
Select the trigger we have just added and press [F2].
In the edit box that appears, enter Original Requisition as the name of the trigger.
The Approve Requisition model should look similar to the following:
An additional input to Change Requisition Status should be the new value to set Status to:
Select Constants/Text in the palette and drop it next to the new trigger (outside Change Requisition Status). Name it Approved.
Add another Trigger to Change Requisition Status. Select it and press [F2] to name it Updated Status.
Add Flow linking the “Approved” constant to the Change Requisition Status/Updated Status trigger.
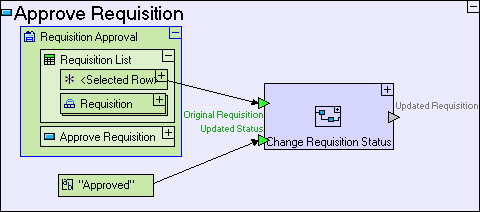
Finally, the process should output the updated Requisition:
Add an Exit
slot (![]() )
to the frame of Change Requisition
Status. Select it and press [F2]
to name it Updated Requisition.
)
to the frame of Change Requisition
Status. Select it and press [F2]
to name it Updated Requisition.
The Approve Requisition model should look similar to the following:
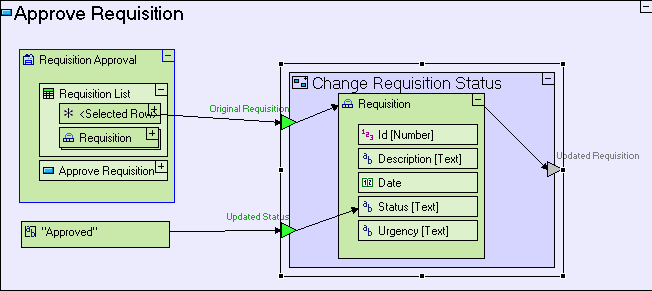
Now let’s drill into Change Requisition Status and model the update of the Status field of Requisition.
Zoom into Change Requisition Status.
Drag the Requisition database record into Change Requisition Status.
Add Flow linking the Original Requisition trigger to the Requisition data structure.
Add Flow linking the Updated Status trigger to the Requisition/Status field.
Add Flow linking the Requisition data structure to the Updated Requisition exit.
The Change Requisition Status model should look similar to the following:
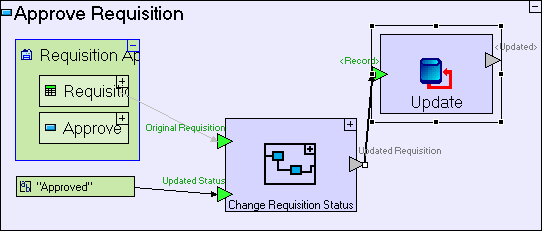
The Updated Requisition exit slot returns an approved requisition, which should be updated in the database. We shall use the Update template for this purpose.
Zoom out to the Approve Requisition button model.
Select the Database/Update
template (![]() )
and place it next to the Change
Requisition Status process.
)
and place it next to the Change
Requisition Status process.
Create Flow linking the Change Requisition Status/Updated Requisition exit to Update/<Record> trigger.
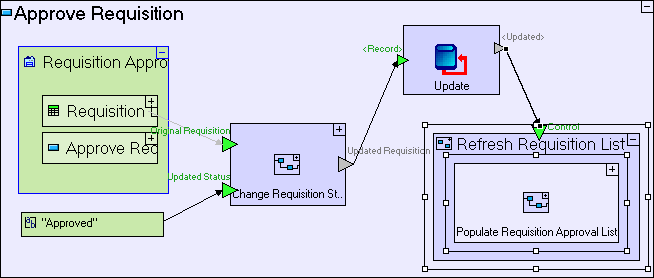
The Approve Requisition model should look similar to the following:
We have to make sure the table is refreshed on screen if Update was successful, so that the display is kept synchronized with the database. On a successful update, the Update process will exit through its <Updated> exit:
Drop a Basic/Action template next to Update. Name it Refresh Requisition List.
We’re creating a new process model, with an identical name to an existing process (there’s a similar Refresh Requisition List process in Submit Requisition). This is possible when the 2 models are in different “packages” in the repository. Giving a new model the name of an existing model in the same package is prohibited.
Right-click Refresh Requisition List and open the Add Element sub menu to select the Control trigger.
Create Flow linking the Update/<Updated> exit to the Refresh Requisition List trigger.
And lastly, reuse the Populate Requisition Approval List process we created in the beginning of this stage:
Drag the Populate Requisition Approval List process from the outline into the Refresh Requisition List process.
The Approve Requisition model should look similar to the following:
Save your work and view the application in the browser.
Click on the Requisition Approval tab.
Click on the Approve Requisition button before selecting a requisition.
Nothing should occur, since no requisition is selected.
Click on one of the new requisitions in the list.
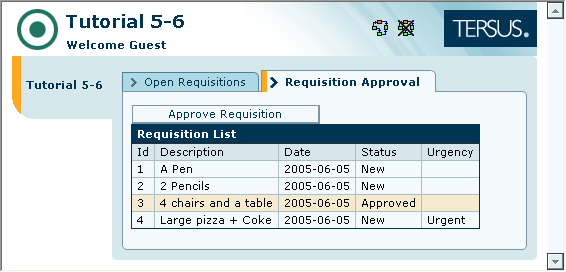
The selected row is signified by a slightly darker background color, as in the following screenshot (3rd row):
Click on the Approve Requisition button.
The table should be refreshed and the requisition selected should change status to Approved, as in the following screenshot:
Import the sample project Tutorial 6-7 and use it as the basis for the next stage of the tutorial.
For a reminder on how to import a sample project, see the Importing a Sample Project section at the end of Stage 2.
This sample project contains all the functionality modeled thus far.
You may now proceed to Stage 7, in which we shall model similar buttons to the Approve Requisition button modeled in this stage, by re-factoring (change) parts of the modeling and re-using it for canceling and rejecting requisitions.
Click here to open the live project in a separate window.